At PTB Farm, we raise our heritage-breed animals outdoors, on pasture, without GMOs or the use of hormones or antibiotics. We think pastured tastes better, and we hope you’ll agree! Our meats are Animal Welfare Approved, certified by A Greener World organization, and we are proud of our ecological farm practices.
Good butchery is an art. I am including our standard cuts here with quick descriptions and some ideas for recipes. This page will be evolving as our cookery and butchery skills evolve over the seasons. Keep in mind there are numerous cuts that will be left off this list as we have chosen other cuts in their stead. If you are interested in a special cut or have a recipe to share, please do!
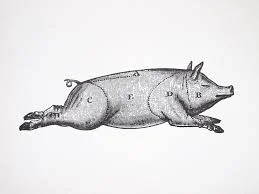
Boston Butt
Picnic Roast
Pork Chops
Spare Ribs
Belly
Shanks
Sausage
Bonesless pork stew / kebab
Cutlets / cubed ham
Bones
Lard
Pork Chops
You know them, you love them. Our pork chops are thick-cut, bone-in and two-per pack. My favorite way to cook chops is to simply salt and pepper both sides, heat a cast iron skillet on medium high heat, add a thick nub of butter or lard and sear the first side for about 5 minutes, or until nicely browned. Flip the chop(s) and slide the skillet into a 375 degree preheated oven for about 5-10 more minutes to reach your desired degree of doneness, then let rest for a few minutes on the cutting board. This is a fabulously simple preparation that goes well with whatever veggies you have and can be thrown together quickly.
For a more elaborate meal, my go-to is “Asian Fusion” Pork Chops.
We serve over rice and garnish with sliced radish, green onions, cilantro, and lime wedge. Worth and I can eat a pork chop each, but if there are other dishes, you could easily share 2 pork chops between 3 or 4 people. This recipe requires some advance planning to marinate the pork, but once the pork is on the stove, it’s a quick preparation. On occasion, we have made this recipe come together in as little as one hour, by putting the marinade together as the chops undergo a quick thaw. While a little extra time is ideal, this recipe never fails to satisfy.
Ingredients:
1 pack PTB bone-in loin chops
1/3 cup soy sauce or tamari
1 Tbsp sesame oil
1 Tbsp rice wine vinegar or lime juice
hot pepper -- we use dried, chopped cayenne chili, but any spicy chili will do (adjust to your spice tolerance level)
1 inch piece of fresh ginger, minced
a couple pieces of star anise (optional)
2 tsp powdered corn starch
1 Tbsp sugar
Garnish with sliced radishes, chopped green onions and cilantro, and a squeeze of fresh lime
Directions:
In advance, thaw the pork. A few hours, or the night before you want to eat, marinate the pork. In a baking dish or bowl large enough for the chops to lay flat, mix the soy sauce, vinegar, sesame oil, hot pepper, ginger, and star anise. Stir in the cornstarch to dissolve completely. Add pork chops, flipping over to distribute the marinade, and flip again about half way through the marinating time.
Preheat the oven to 350. Heat an oven-safe skillet large enough to accommodate the pork on medium-high heat and add about a tablespoon of high-heat oil or lard. Sprinkle each side of the pork with a light dusting of sugar and then sear in the skillet. Cook each side until nicely browned and caramelized, approximately 3 minutes. Slide the skillet into the oven and cook until an internal meat thermometer reads 145 (approximately 5-8 minutes depending on thickness). Take the pork out of the skillet and let rest on a cutting board. Add the marinade to the skillet over medium heat while stirring continuously until it has reached a thick, syrupy consistency. Serve the pork over rice, add the soy sauce "gravy" and finish with garnishes of cilantro, radish, green onions, and/or lime wedge. Eat immediately. For an alternate presentation, you may slice the pork into slabs approximately 1/2 thick and serve over rice.
Pork Shoulder Roast
A shoulder roast can be either a picnic or a boston butt, and I think of them interchangeably, although the shape of the bone varies slightly for each cut. The shoulder roast is a perfect “low and slow” cut, so much so that my brother-in-law once wrote a limerick about this cut:
The Boston Butt
is a noble cut
With a little sear-and-braise
It will surely win your praise
I’m partial to wet cooking over dry cooking, but our heritage breed pigs have enough fat marbling that you can as easily bake, braise, smoke, or roast without drying the meat out. To bake it, administer a dry rub generously and then pop it in the oven. I recommend starting out hot (like 425) for about 15 minutes, then turning the temp down to 325, and baking until the internal temp reads 185 (probably 4ish hours, depending). My go-to spice rub is equal proportions (e.g. 1 tsp each): salt, pepper, paprika, sugar, cumin, and sometimes dry mustard. But really, get creative and use whatever you most like in your spice drawer right now!
For wet cooking, I recommend a sear and braise. I use a big Dutch oven, melt a generous dollop of lard over medium-high heat, and sear the outside of the roast. Try to get every side, but don’t stress it. Then I like to add some rough chopped onions, about ½ cup sweet vermouth or wine, and a can of tomatoes, put the lid on and turn down to simmer -- about 4 hours, or until the meat is falling off the bone/fork tender. Serve it over polenta or with mashed potatoes. Often, I will make a chili sauce with the braise liquid, then add the meat back into the sauce for pork tacos, one of our favorite meals to make for gatherings at the farm.
For the Chile Sauce, a collection of dry peppers to suit your taste for example:
-2 ancho chiles
-2 morita chiles
-2 guajillo chiles
-1 onion, skin removed, cut into quarters
-3 -5 cloves of garlic, whole, skin-on
- a chunk of stale bread or tortillas (or animal crackers, or whatever you have in the pantry)
-the cooking liquid from the pork
-oil (we use lard)
To make the Chile Sauce:
Rehydrate the chiles by heating them in a dry skillet over medium high heat, turning so that all sides get warmed pliable and they start to smell toasty. Then add them to the pot with the hot cooking liquid from the pork, removing any stems that are still attached (removing the seeds will reduce the level of spiciness). The cooking liquid must be hot, or the chiles will not rehydrate. Let the chilis sit the in the cooking liquid for at least five minutes. Meanwhile, "dry fry" the onion and garlic in the skillet. You are blackening the onion and roasting the garlic -- flip them so all sides get exposed to the heat. Remove the onion and garlic from the skillet, removing the garlic skins when it cools, and turn the heat down to low. Add oil and the bread (or tortillas or animal crackers or whatever you are using). Fry the bread on both sides, and then set the skillet to the side to let it cool. To make the sauce you put all the ingredients in the food processor or blender and blend until smooth. I usually add the chilis and some of the cooking liquid first, then the onion and the garlic (don't forget to peel it!) and then the bread and the remaining cooking liquid. Taste for balance -- you may find it needs salt, some vinegar perhaps, or even a bit more spice. You can add more spice by adding in cumin, chili powders or paprika.
After the sauce is made, the pork should be cool enough to handle. Now chop the pork, adding it back into your pot and mix it with your chili sauce. Gently reheat and serve!
We love this for pork tacos, served with warm corn tortillas, pickled red onions, fresh cilantro and sliced radishes. Additionally, this pork is great with a cumin-infused cabbage salad and fresh cornbread.
-pork spare ribs
Spare ribs are one of my favorite all time things to eat, and one of the easiest things to prepare if you have a couple hours of “hands-off cooktime” to set aside. Spare ribs will not become tender if you grill them quickly; they need the low-and-slow treatment. You can get smokey delicious ribs by grilling them super low, but they have the tendency to get “oversmoked” and can even dry out, so most recipes will encourage you to start them on the grill for the smoke flavor and then finish in the oven (about an hour each at about 250-275). I find that cooking them in the oven with a dry rub is the easiest, most rewarding preparation. Make a generous amount of dry rub by mixing salt, pepper, sugar paprika, cumin, and whatever you like (Marc Bittman’s recipe calls for ½ tablespoon salt, 2 tablespoons sugar, and then about 3 tablespoons of other spices). Generously rub both sides of the ribs and place on a roasting pan. Bake at 300 for 2 hours or so, or until the ribs have shrunk up a bit, are fully cooked and very tender. If fat is rendering off as you cook, you can spoon or pour off any of that accumulating fat every so often. When you are ready to eat, turn the oven up to 450 and give the ribs a final high heat sizzle until nicely browned, but be careful not to burn them!
-pork belly
There are so many delicious things to make with a fresh pork belly. Yes this is the cut bacon comes from, but it is so much more than just bacon. It is a rich cut and when cooked properly, is supple and amazing. We like to make pork belly porchetta, or chinese-style red pork belly (Hong Shao Rou). But everyone loves bacon, and it is actually pretty simple to make at home, with a little salt and time. Most store-bought bacon is cured with nitrates, which give it that bright red color, and is often smoked. You may want to use those techniques, but we will tell you about a more traditional method.
Working with a fully thawed piece of pork belly, lightly coat the belly on all sides with coarse sea salt (morton kosher, David’s, or similar). If you have a scale weigh out 3% of the weight of the meat and apply this much salt to the meat. Apply a similar coat of black pepper and approximately 2 tablespoons of sugar or maple syrup to the meat.
Place the belly back in the plastic bag that it come out of, or a fresh one, then on a pan or plate that will catch any drippings. Place back into the refrigerator. The next day pour off any excess liquid, redistribute seasonings if necessary and flip the belly, put it back in the refrigerator. Next day, rinse the belly thoroughly in cold water. Place it on a rack above a plate or pan. You can dab it dry if you like and apply additional black pepper to your preference. Place back in the fridge without a bag for a few hours or overnight to firm up.
Study the belly on the edge to determine which way you want to cut it. With a sharp knife on a cutting board cut the belly to desired thickness. Place in a skillet or on a broiler pan and cook just as you would any other bacon.
Some variations to this recipe include, not using sugar or black pepper, or substituting other spices that you want to. Cold or hot smoking the belly is another finishing touch you may care to add. Some important factors to understand with this type of curing are: the product is nitrate free, the preservation capacity is reduced in comparison to conventional bacon, so freeze whatever you do not use within 4-5 days.
This recipe will not render you a legally “cured” product, but it will make a delicious nitrate-free homemade bacon.
-pork shanks
Shanks are pretty much my favorite cut of meat on any animal. The mixture of bone, collagen, fat, and muscle makes any dish prepared with shanks deeply delicious and satisfying. Slow cooking is essential to break down the collagen and connective tissue, and coax all the good stuff out of the bone, but when you do you’ll be rewarded fabulously. Again, a sear and braise is what I would recommend. When we prepare pork shanks we’ll often braise in canned tomatoes from the summer and serve it over warm creamy polenta. But they would be great with mashed potatoes and braised with apples, apple butter, or even apple cider as well.
-Lard
Lard is a high-heat oil, and we are proud and excited to have local oil available from our own very well-cared for animals. At our house, we use a variety of cooking fats - olive oil, lard, and butter - depending on the recipe. Use lard to fry chicken, sear your meats, or even make a lovely, supple pastry crust. We use Deborah Madison’s classic galette dough recipe (2 cups flour/12 Tbsp butter/1 tsp sugar/1 tsp salt/ice water) for most of our pastry crusts. I used to prefer the consistency of using ½ butter and ½ lard, but I’ve been working on my lard crusts, and I’m starting to really enjoy the all-lard crust as well. I also make buttermilk biscuits with lard and our local Lindley Mills flour for a lazy Sunday morning treat. Lard is high in vitamin D, which helps us metabolize calcium, so remember to cook your greens with a little lard to help make all the nutrients available!